[FONT=Arial, Helvetica, sans-serif]Installation of Oil Pressure and Water Temperature Gauges[/FONT]
[FONT=Arial, Helvetica, sans-serif]
[/FONT]
[FONT=Arial, Helvetica, sans-serif]
[/FONT]
[FONT=Arial, Helvetica, sans-serif]
Why is this necessary? The 2000 Mustang oil pressure sending unit is just an on/off switch. When the pressure reaches 6 psi, the switch goes on and the oil pressure gauge goes from zero to mid-scale. The water temperature gauge indicates temperature changes up to about 90 degrees C (194 degrees F), which is mid-scale, but the needle will not move any higher until/unless some extremely high water temperature is reached. Neither of these stock gauges gives true readings or any warning of developing problems. Aftermarket (real) gauges do that. [/FONT]
[FONT=Arial, Helvetica, sans-serif]
[/FONT]
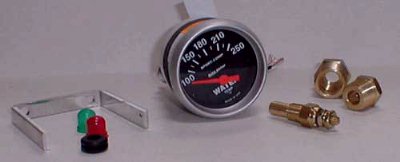
[FONT=Arial, Helvetica, sans-serif] Autometer #3337 2-1/16" electric water temperature gauge, with 1/8" NPT sending unit and 3/8" & 1/2" NPT adapters ($39.95 - Summit Racing)
[/FONT]
[FONT=Arial, Helvetica, sans-serif]
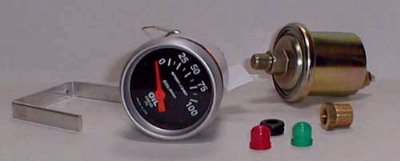
[/FONT] [FONT=Arial, Helvetica, sans-serif] Autometer #3327 2-1/16" electric oil pressure gauge, with 1/8" NPT sending unit and 1/4" NPT adapter ($49.95 - Summit Racing) [/FONT]
[FONT=Arial, Helvetica, sans-serif]
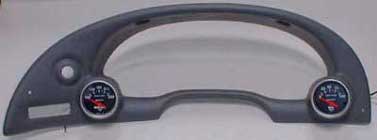
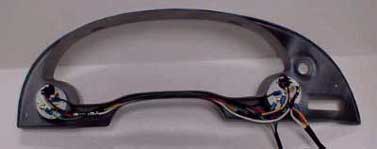
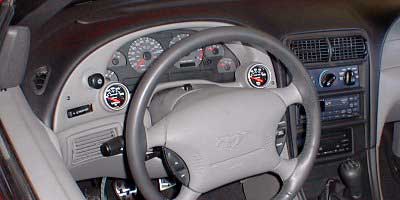
[/FONT] [FONT=Arial, Helvetica, sans-serif] Autometer #10003 94-00 Mustang 2-1/16" Dual Instrument Cluster ($59.95 - Summit Racing). Painted with DupliColor Vinyl & Fabric "Medium Gray", which is a close match to my "Medium graphite" interior trim. The gauges press fit into the cluster. The two long mounting screws in the back of each gauge are not used, and should be cut off. There is a rubber skirt at the bottom of the stock instrument cluster. It can be re-used when you install the new one. [/FONT]
[FONT=Arial, Helvetica, sans-serif]
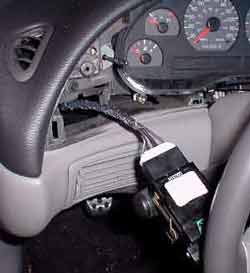
[/FONT] [FONT=Arial, Helvetica, sans-serif]When you pull the Rear Window Defrost Control Switch out of the dash, it exposes wires with all the power feeds needed for this installation.
[/FONT]
[FONT=Arial, Helvetica, sans-serif]
[/FONT] [FONT=Arial, Helvetica, sans-serif] I spliced wires into the following lines:
[/FONT]
- [FONT=Arial, Helvetica, sans-serif]Pin 3 - "Power Feed (Hot in Run)" - provides +12V for the gauges. [/FONT]
- [FONT=Arial, Helvetica, sans-serif]Pin 4 - "Switch Ground" - provides a ground the lights (the gauges will be grounded with a wire to the engine block). [/FONT]
- [FONT=Arial, Helvetica, sans-serif]Pin 5 - "Switch Illumination" - provides +0 to +12V for the lights (dimmer circuit). [/FONT]
[FONT=Arial, Helvetica, sans-serif]
Caution: There are two black wires. The smaller one is the "switch ground" wire. [/FONT]
[FONT=Arial, Helvetica, sans-serif]
[/FONT] [FONT=Arial, Helvetica, sans-serif] The gauge pod installed. I had to slightly enlarge the holes for the Light switch and the Rear Window Defroster switch. Otherwise it fit fine. The wiring worked as planned. The gauge lights dim along with the dash lights. [/FONT]
[FONT=Arial, Helvetica, sans-serif]
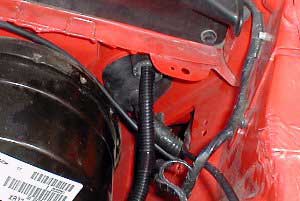
[/FONT] [FONT=Arial, Helvetica, sans-serif] Rather than cut or modify the stock firewall grommet, I pried it aside and inserted a 3" piece of 5/8" radiator hose along side the grommet, in the same opening. Then the wire loom containing three wires (two sender wires and a ground wire) was run through it. I will seal this opening with silicon sealer when the gauge installation is completed. [/FONT]
[FONT=Arial, Helvetica, sans-serif]
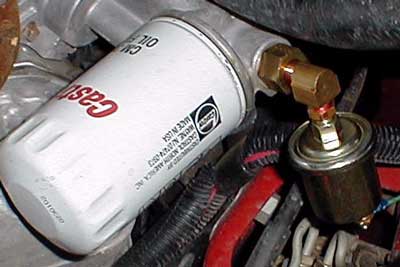
[/FONT] [FONT=Arial, Helvetica, sans-serif] The stock oil pressure sending unit is in an almost inaccessible spot, so I installed the Autometer sending unit in the the #8 O-ring plugged hole at the base of the oil filter. The sending unit is mounted at a right angle so that it clears the front sway bar. Three fittings were used to mount the sender: (1) a #8 O-ring plug to 1/4" NPT adapter (2) a 1/4" NPT Ell, and (3) a 1/4" NPT to 1/8" NPT adapter. [/FONT]
[FONT=Arial, Helvetica, sans-serif]
[/FONT] [FONT=Arial, Helvetica, sans-serif] You can get the #8 O-ring to 1/4" NPT adapter (drawn above) from a firm that sells hydraulic fittings. If they don't understand what you want, try asking for a 1/2" male o-ring port to 1/4" female pipe thread adapter. The other two fittings are standard hardware store items. [/FONT]
[FONT=Arial, Helvetica, sans-serif]
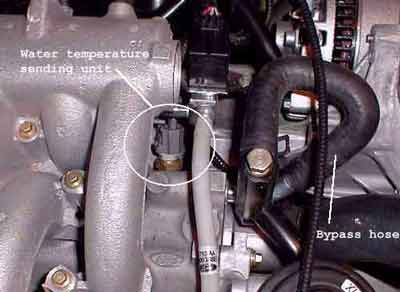
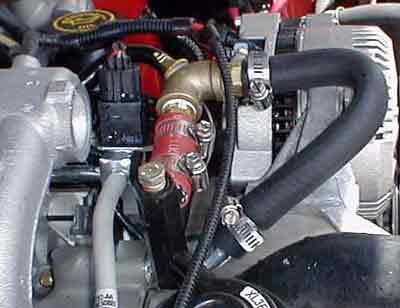
[/FONT] [FONT=Arial, Helvetica, sans-serif] The stock water temp sending unit is also in a tight spot, right under the drivers side fuel rail. I've heard that putting in a T connector to run two temp sending units can cause problems (low readings) because the sending units are no longer directly in the flow of hot water. So I decided to leave the stock unit alone, and mount the Autometer water temp sending unit on the bypass hose to the right. That's where the water temp sending unit is mounted on DOHC Cobra engines. [/FONT]
[FONT=Arial, Helvetica, sans-serif]
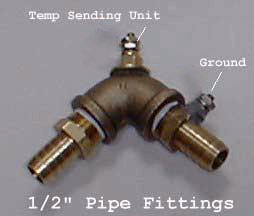
[/FONT] [FONT=Arial, Helvetica, sans-serif] The water temp sending unit, ready for installation. A 90 degree brass fitting has been drilled and tapped for the 1/4" NPT sending unit. Since there will be no metal-to-metal contact with the engine, I also drilled and tapped a ground connection (10-32 machine screw & nut).
[/FONT]
[FONT=Arial, Helvetica, sans-serif]
[/FONT] [FONT=Arial, Helvetica, sans-serif] Sender installed in the bypass hose. The new curved hose is from Pep Boys, #80400 CS. [/FONT]
[FONT=Arial, Helvetica, sans-serif] The total cost of this installation was about $175 That included: gauges = $90, gauge bezel = $60, wire, connectors, hose, pipe fittings, wire loom = $25 [/FONT]
[FONT=Arial, Helvetica, sans-serif]
[/FONT] [FONT=Arial, Helvetica, sans-serif]
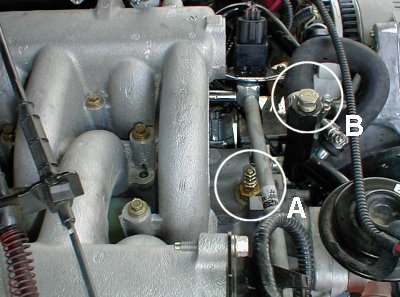
Update - May 2005: I recently pulled the intakes off my car to port/polish them, and used that occasion to drill and tap the lower intake for a 3/8" to 1/4" NPT brass adapter to mount the Autometer temperature sending unit. (shown at A in the photo above) To do that you need a 9/16" drill and a 3/8" NPT tap. On a 99-00 car you can drill into the pad just above the thermostat (as shown above). On 01-04 cars, you have your choice of that pad or the pad where the stock sender used to be located. (In 2001 the stock temperature sending unit was moved to a cylinder head). [/FONT]
[FONT=Arial, Helvetica, sans-serif] Another approach used by some people is to screw the temperature sending unit into the cooling system vent tube (shown at B above). It seems to work O.K. in that location, but you have to take it out every time you drain/fill/vent your cooling system, and if all the air is not bled from the cooling system, there is a possibility that the sending unit will be surrounded by air rather than hot coolant. I chose to go with a permanent installation in the lower intake, where I know the sending unit will come in direct contact with the coolant. [/FONT]