
[FONT=Arial, Helvetica, sans-serif]How to hook your iPod up to your Mustangs Mach 460 factory radio[/FONT]
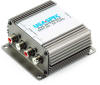
[FONT=Arial, Helvetica, sans-serif] I have a 2002 Ford Mustang GT with a Mach 460 6-Disc CD Changer. I'll be hooking it up to my fourth generation 40GB iPod Photo.[/FONT][FONT=Arial, Helvetica, sans-serif] To get the ball rolling, I purchased a USA SPEC Auxiliary Interface from Crutchfield. It adds two sets of composite audio jacks to the stereo. It comes with cables that simulate the additional CD changer. The other option would be a unit that actually lets you control the iPod via the stereo controls but I didn't want that because when you have that you can't use the iPod interface to choose songs. You're limited to 6 preprogrammed playlists accessible via the stereo controls. I'd rather have the option of choosing exactly what songs I want to play.[/FONT]
[FONT=Arial, Helvetica, sans-serif] There are various brands of these and you can buy them from a lot of different places. I chose Crutchfield because they have a 30 day return policy and will even cover the shipping. Since I'm not entirely sure what I'm getting into that seemed like a nice safety net. It should arrive in a few days and then it will be time to rip out the stereo and see what kind of a mess I can make.[/FONT]
[FONT=Arial, Helvetica, sans-serif]
 [/FONT]
[FONT=Arial, Helvetica, sans-serif]March 31, 2005
Crutchfield is already scoring high points in my review. The package arrived today! The instructions are incredibly detailed. They have photos of my car and my stereo and instructions about how to remove the plastic panels, disconnect the wires, and pull out the stereo. Very impressive.[/FONT]
Crutchfield is already scoring high points in my review. The package arrived today! The instructions are incredibly detailed. They have photos of my car and my stereo and instructions about how to remove the plastic panels, disconnect the wires, and pull out the stereo. Very impressive.[/FONT]
[FONT=Arial, Helvetica, sans-serif]April 2, 2005
I decided to take a stab at the installation tonight. I took lots of pictures along the way for two reasons. One, I wanted to have a reference of how to put everything back together. Secondly, in all my research I never found a good, detailed web page describing how to install the iPod adapter in a Mustang. I was prepared for a long battle but it ended up being a piece of cake. Even with me taking my time I was finished in an hour. I could probably redo it in a half hour or less now. Even if you know nothing about electrical systems or cars, don't be a afraid of this one. It's simple.[/FONT]
I decided to take a stab at the installation tonight. I took lots of pictures along the way for two reasons. One, I wanted to have a reference of how to put everything back together. Secondly, in all my research I never found a good, detailed web page describing how to install the iPod adapter in a Mustang. I was prepared for a long battle but it ended up being a piece of cake. Even with me taking my time I was finished in an hour. I could probably redo it in a half hour or less now. Even if you know nothing about electrical systems or cars, don't be a afraid of this one. It's simple.[/FONT]
[FONT=Arial, Helvetica, sans-serif] Before you get started, disconnect the ground wire from the battery. You're going to be screwing around with a lot of plugs and wires and you don't want anything to short out.[/FONT]
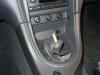
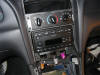
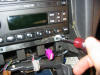
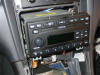
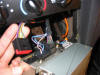
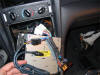
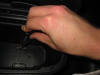
[FONT=Arial, Helvetica, sans-serif] First unscrew the gear shift cap and set it aside. Now pull off the panel around the gear shift. There are four metal clips the will release as you work them out. Disconnect power to the cigarette lighter. There is a small tab to depress and then the connector will slide out. It helps to use a small screw driver to push in the tab while you pull out. Slide the boot and panel over the gear shift and set it aside. It helps at this point to put the car into second gear so the gear shift is out of the way. Now remove the panel around the radio and climate controls. Slide your fingers in the crack until you feel the tabs releasing. There are 6 tabs in all. Disconnect the cables from the fog lights, traction control, and rear defroster buttons in much the same way as the cigarette jack came out. Now you can set that panel aside as well. There are two 7mm screws along the bottom of the receiver that hold it in place. Remove those and the receiver will slide out.[/FONT]
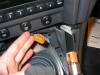
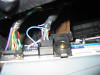
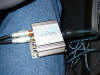
[FONT=Arial, Helvetica, sans-serif] The kit comes with two cables to connect to the stereo: CAS-F10 and CAS-F20. You'll only use one depending on which version of the stereo you have. I used the CAS-F20 but your mileage may vary. Only one will fit so it's not hard to figure out. For the F20, disconnect the two big plugs. There is a tab on the bottom that you depress before pulling the cable out. Insert those two plugs into the white female jacks on the F20 cable. Also you can connect the F10 plug at this time. Connect the two plugs on the other end of the F20 cable to the stereo. Push hard until you hear them click into place. Connect a cable to the AUX inputs (not included in the kit.) There is a hole behind the stereo that you can put the headphone jack through. It comes out near your right shin when you're positioned for driving.[/FONT]
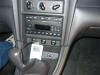
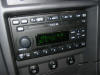
[FONT=Arial, Helvetica, sans-serif] Reinsert the receiver part way into the dash just so it's being held close to it's proper place. Reconnect the ground to the battery and turn on the car. Check to see that your stereo and CD changer works as before. To use the AUX interface, hold down the CD button until it says DJ. The first AUX input is track 1 and the second AUX input is track 2. Play something on your iPod and you should be all set! [/FONT]
[FONT=Arial, Helvetica, sans-serif] Since you disconnected the battery, all your stereo settings will be lost. It's actually kind of fitting that your presets are gone. Who cares? You have an iPod now! Don't forget to turn the speed sensitive volume back on. While the stereo is on, hold down the power button until the Speed Vol setting appears. Use the select arrows to bump it up to about 4. Release the power button and the radio will turn off. The next time you turn the radio on, the volume will use that setting.[/FONT]
[FONT=Arial, Helvetica, sans-serif]

 [/FONT]
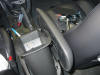
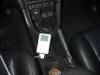
[FONT=Arial, Helvetica, sans-serif]This isn't the end of the project but it's the biggest hurdle. I now need to mount my iPod and get a charging system hooked up. I ordered a Belkin TuneDok which holds the iPod in the cup holder. I also ordered a Belkin Auto Kit. It will charge the iPod from the cigarette lighter and also provide a line-out jack which has better quality sound than the headphone jack. It also has an adjustable amplifier so that you don't have to turn up the stereo so high. I was originally going to mount the iPod onto the center vent so it would be at eye level. Doing it this way will allow me to hide the wires better. I'll run the power to the power point inside the center console and just have the one dock cable appear from below the drivers seat to connect to the iPod. It should look very neat and tidy.[/FONT]
[FONT=Arial, Helvetica, sans-serif]April 13, 2005
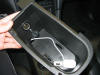
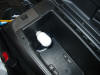
I finished up the project today. The cup holder and auto kit came in a few days ago. The cup holder fits in the front cup holder and holds the iPod in just about any position you want. It makes for a nice looking installation but I'm not sure if it's really worth the money. You could just set it in the cup holder. It's not like you can really be looking down to read it while you're driving. I took out the armrest bucket this evening and installed the auto kit. Unplug the battery, remove the two screws from the bottom of the armrest bin (use a 7mm socket), pull it out and disconnect the power point. Drill a hole in the bottom of the bin big enough for the audio cable and auto kit to slide through. Reassemble and voila! It makes for a very professional looking installation. The audio cable runs under that console all the way from the radio into the bin and connects at the power point with the power jack. The dock connector cable runs back out the hole in the bottom of the bin and peeks out under the seat right by the cup holder. Plug in that cable and it all magically works.[/FONT]
[FONT=Arial, Helvetica, sans-serif]
 [/FONT]
[FONT=Arial, Helvetica, sans-serif] The longest part of this project was just waiting for parts to come in. If you gave me all the parts and a car to start on, I could do this project start to finish in less than an hour. There's nothing to it, and the result is well worth it. It sounds great and now I have my entire music library with me wherever I go.[/FONT]
[FONT=Arial, Helvetica, sans-serif]found @ http://www.studio711.com[/FONT]