
2005 - 2009 Mustang Radio Install
By Joe O'Rourke (OsirisGuy)
Difficulty: 2
Materials:
Wire Harness - Check out Metra Electronics for the exact one
Radio Kit - Metra Part #'s 99-5807 04+ Ford Multi Kit; 99-5812 04+ Ford Single DIN Kit; 95-5812 Late Model Ford Double DIN (DDIN) Kit
Tools:
Plastic Panel Popper (Helps!) or a Flathead Screwdriver and a towel
Philips Head Screw Driver
7 mm Socket
Here were the parts I used:


Disclaimer
The following install was done on a 2006 4.0 V6. I have not done this in the other years (05, 07, 08, 09), however the removal procedure should be the same. The only real difference you should see is when it comes to the actual radio.
This should be used as a guide and I accept no responsibility for any problems that may arise, including but not limited to radio malfunction, broken trim pieces and blown fuses. If you are uneasy at the idea of taking apart your car I HIGHLY recommend you take your car to a professional installation place.
Don't let the legalities scare you though. It is fairly straight forward and anyone with a little knowledge and common sense can accomplish this.
READ through this before you start, make sure you understand each step and print this out or write them down for when you are working in your car. Great thing about technology is if you're on a laptop you can bring it out with you and leave this page open and just follow it from there. Knowing what you are doing before you do it will be very beneficial; it will save you time during the install, lessen the chance of making a mistake, and make the job overall easier as well as make you more confident as you are doing it. Reading before hand will also give you an idea of what steps are involved and if you are capable of doing this install.
Procedure:
Preliminary - It is always a good idea to disconnect the battery (positive terminal lead) before you begin, however you run the risk of losing some memory saved features, such as the saved radio stations (presets). Since you are replacing the radio anyway you will lose the radio presets so if you have a few you can write them down and put them on your new radio. If you have steering wheel radio controls you will lose these too.
Also do not start the car while things are apart. If an airbag light is disconnected starting the car will cause the light to stay on after and a trip to the dealership and a lighter wallet.
1. Pop off the shifter bezel using the panel popper, a screwdriver (carefully!) or even your fingers. Wrap a towel around the screwdriver tip so you will not scratch or mar the plastic panels and trims.


2. Open up the center console and look towards the back. See those two philips head screws? Yes they have to come out.


3. Engage the parking (sometimes referred to as the emergency brake) brake (unless it's a manual where it should already be, and left engaged), while not totally necessary you will soon find out it makes things much easier to an already complicated console removal. Placing the car in Neutral will also make things much easier. Now do just that - from the opposite end of the radio pop off the center console. The whole thing does not come out, just a trim piece. You can pull up on this and/or use the panel popper to unclip those clips.


It will be a PITA to get it over the parking brake but is very possible. You will just have move it around and place it in weird angles at some points and you will wind up with this:

4. The trim running up and down along side of the radio is only held in by clips. With one hand you can grab the trim near the radio and if necessary use your other hand behind the trim piece by the center console kick panel (basically just grab the whole piece) and pop it straight back and off (towards the back of the car and not towards the door). While you don't need that second hand sometimes panels can be stubborn and need a little bit more leverage on getting them out. It should be very possible to just grab it and pop it back off however.

You will have this, and you are almost there

5. Grab the 7 mm socket and take out the trim around the radio. I forget how many exactly, but it should be 6 bolts that hold in the trim. Two on the top, two on bottom and two adjacent to the center of the radio.

6. Starting from the bottom, again pop off the trim piece for the radio. Disconnect any attached wiring. TIP: Placing the car in Neutral will also make things much easier.

I feel as though I should mention here that we had a slight problem pulling the bottom off. The HVAC (A/C and heater) controls should pop off with the trim which is where you would disconnect them, however the wiring seemed to have snagged on something where we had to take an allen wrench and disconnect the HVAC face from the trim. If this happen be patient since you will have to squeeze in between and with small slight turns unscrew the HVAC controls from the radio trim piece.

Now you have the radio to remove

7. With the socket again remove the four bolts securing the radio. Remove and CD's inside and then you can unplug all the wires from the radio. Again, placing the car in Neutral will also make things much easier. You can really leave the car in neutral, just do not lower (disengage) the parking brake.


8. We also installed the iPod cable. You wouldn't believe how simple it usually is, especially on newer radios where they just plug straight into the back. Usually you can drop the iPod end into the glove box. For this install we ran the iPod wire up the center console and inside the center console storage. Here there is a plastic plate for access underneath that the iPod cable can come out of. Drilling a slight hole on it's edge can give a perfect fit for the cable and a very custom look. You can also drill a small hole large enough to pass the small end of the iPod cable through the new storage pocket (if applicable) for easier access. Sorry, no pics for that.
9. Using the same four bolts plug all your wires in and fit the kit into the radio housing and bolt it back in.


10. Reassembly is just the reverse for removal - Summary.
Reconnect the radio trim plugs and harnesses. Pop the radio trim back on

11. Don't forget those 6 screws to hold in the trim piece!

12. Pop those side trim pieces back on.

13. Get the center console panel trim over the parking brake. Pop the front end back in first and go along, tucking in the sides of the trim snapping the trim piece back in. You can place the car back into park and disengage the parkng brake, unless it's a manual of course.

14. Screw those two philips heads back in near the back to secure the trim.
15. Finally pop back in the shifter trim piece

16. If you unplugged your battery go ahead and reconnect it now.
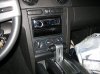
And that's all there is for the install! A picture of the final work:

Special Thanks to my brother-in-law for letting me use his car as a test subject and for the quick hand he gave me.
Some more legal stuff:
Please give credit where credit is due. What I mean is please do not plagiarize my work. I have no problem with the spreading of free information, all I ask is that you link to the original article, or leave the article unchanged where the original author is mentioned. I'd be happy for those to add to this and make corrections, especially for slight changes between years and I have no problem adding your name on to the end of the credits list.
Anyone can find me here by the handle OsirisGuy if they need to contact me. Some of them I check everyday, others once per year but a PM will always go to my E-Mail.
Creditors: Joe O'Rourke (OsirisGuy).
Written by J. O'Rourke. Photos by J. O'Rourke
Work, words, photos and complete article is Copyright.
Dated: 2009/05/11 Version: 110509.05
By Joe O'Rourke (OsirisGuy)
Difficulty: 2
Materials:
Wire Harness - Check out Metra Electronics for the exact one
Radio Kit - Metra Part #'s 99-5807 04+ Ford Multi Kit; 99-5812 04+ Ford Single DIN Kit; 95-5812 Late Model Ford Double DIN (DDIN) Kit
Tools:
Plastic Panel Popper (Helps!) or a Flathead Screwdriver and a towel
Philips Head Screw Driver
7 mm Socket
Here were the parts I used:
Disclaimer
The following install was done on a 2006 4.0 V6. I have not done this in the other years (05, 07, 08, 09), however the removal procedure should be the same. The only real difference you should see is when it comes to the actual radio.
This should be used as a guide and I accept no responsibility for any problems that may arise, including but not limited to radio malfunction, broken trim pieces and blown fuses. If you are uneasy at the idea of taking apart your car I HIGHLY recommend you take your car to a professional installation place.
Don't let the legalities scare you though. It is fairly straight forward and anyone with a little knowledge and common sense can accomplish this.
READ through this before you start, make sure you understand each step and print this out or write them down for when you are working in your car. Great thing about technology is if you're on a laptop you can bring it out with you and leave this page open and just follow it from there. Knowing what you are doing before you do it will be very beneficial; it will save you time during the install, lessen the chance of making a mistake, and make the job overall easier as well as make you more confident as you are doing it. Reading before hand will also give you an idea of what steps are involved and if you are capable of doing this install.
Procedure:
Preliminary - It is always a good idea to disconnect the battery (positive terminal lead) before you begin, however you run the risk of losing some memory saved features, such as the saved radio stations (presets). Since you are replacing the radio anyway you will lose the radio presets so if you have a few you can write them down and put them on your new radio. If you have steering wheel radio controls you will lose these too.
Also do not start the car while things are apart. If an airbag light is disconnected starting the car will cause the light to stay on after and a trip to the dealership and a lighter wallet.
1. Pop off the shifter bezel using the panel popper, a screwdriver (carefully!) or even your fingers. Wrap a towel around the screwdriver tip so you will not scratch or mar the plastic panels and trims.
2. Open up the center console and look towards the back. See those two philips head screws? Yes they have to come out.
3. Engage the parking (sometimes referred to as the emergency brake) brake (unless it's a manual where it should already be, and left engaged), while not totally necessary you will soon find out it makes things much easier to an already complicated console removal. Placing the car in Neutral will also make things much easier. Now do just that - from the opposite end of the radio pop off the center console. The whole thing does not come out, just a trim piece. You can pull up on this and/or use the panel popper to unclip those clips.
It will be a PITA to get it over the parking brake but is very possible. You will just have move it around and place it in weird angles at some points and you will wind up with this:
4. The trim running up and down along side of the radio is only held in by clips. With one hand you can grab the trim near the radio and if necessary use your other hand behind the trim piece by the center console kick panel (basically just grab the whole piece) and pop it straight back and off (towards the back of the car and not towards the door). While you don't need that second hand sometimes panels can be stubborn and need a little bit more leverage on getting them out. It should be very possible to just grab it and pop it back off however.
You will have this, and you are almost there
5. Grab the 7 mm socket and take out the trim around the radio. I forget how many exactly, but it should be 6 bolts that hold in the trim. Two on the top, two on bottom and two adjacent to the center of the radio.
6. Starting from the bottom, again pop off the trim piece for the radio. Disconnect any attached wiring. TIP: Placing the car in Neutral will also make things much easier.
I feel as though I should mention here that we had a slight problem pulling the bottom off. The HVAC (A/C and heater) controls should pop off with the trim which is where you would disconnect them, however the wiring seemed to have snagged on something where we had to take an allen wrench and disconnect the HVAC face from the trim. If this happen be patient since you will have to squeeze in between and with small slight turns unscrew the HVAC controls from the radio trim piece.
Now you have the radio to remove
7. With the socket again remove the four bolts securing the radio. Remove and CD's inside and then you can unplug all the wires from the radio. Again, placing the car in Neutral will also make things much easier. You can really leave the car in neutral, just do not lower (disengage) the parking brake.
8. We also installed the iPod cable. You wouldn't believe how simple it usually is, especially on newer radios where they just plug straight into the back. Usually you can drop the iPod end into the glove box. For this install we ran the iPod wire up the center console and inside the center console storage. Here there is a plastic plate for access underneath that the iPod cable can come out of. Drilling a slight hole on it's edge can give a perfect fit for the cable and a very custom look. You can also drill a small hole large enough to pass the small end of the iPod cable through the new storage pocket (if applicable) for easier access. Sorry, no pics for that.
9. Using the same four bolts plug all your wires in and fit the kit into the radio housing and bolt it back in.
10. Reassembly is just the reverse for removal - Summary.
Reconnect the radio trim plugs and harnesses. Pop the radio trim back on
11. Don't forget those 6 screws to hold in the trim piece!
12. Pop those side trim pieces back on.
13. Get the center console panel trim over the parking brake. Pop the front end back in first and go along, tucking in the sides of the trim snapping the trim piece back in. You can place the car back into park and disengage the parkng brake, unless it's a manual of course.
14. Screw those two philips heads back in near the back to secure the trim.
15. Finally pop back in the shifter trim piece
16. If you unplugged your battery go ahead and reconnect it now.
And that's all there is for the install! A picture of the final work:
Special Thanks to my brother-in-law for letting me use his car as a test subject and for the quick hand he gave me.
Some more legal stuff:
Please give credit where credit is due. What I mean is please do not plagiarize my work. I have no problem with the spreading of free information, all I ask is that you link to the original article, or leave the article unchanged where the original author is mentioned. I'd be happy for those to add to this and make corrections, especially for slight changes between years and I have no problem adding your name on to the end of the credits list.
Anyone can find me here by the handle OsirisGuy if they need to contact me. Some of them I check everyday, others once per year but a PM will always go to my E-Mail.
Creditors: Joe O'Rourke (OsirisGuy).
Written by J. O'Rourke. Photos by J. O'Rourke
Work, words, photos and complete article is Copyright.
Dated: 2009/05/11 Version: 110509.05
Attachments
-
 29.9 KB Views: 682